Mapping & Styling Part 1 | Learning the Basics
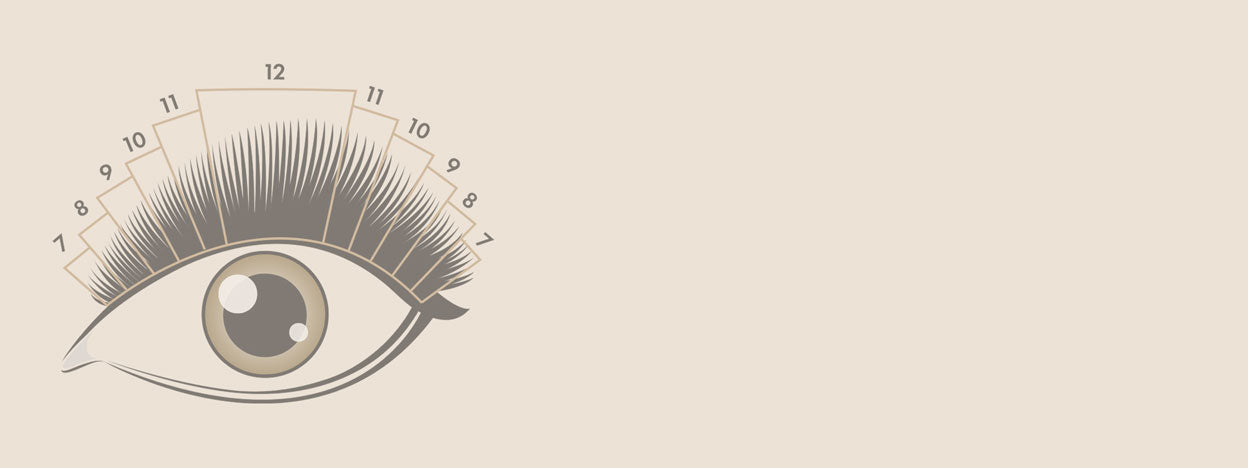

Table of Contents
Learning the Basics of Mapping and Styling
No matter how experienced you are as a Lash Technician, it’s well worth knowing how and why to map your lash sets. By using a Lash Mapping Pen to draw out your maps on an Eyepatch, you’re ensuring symmetry and a nice even lash extensions application across both eyes, and you’re also creating unique lash sets that suit each individual client based on their own face and eye shape. If you’re new to lash maps and styling, don’t panic, we’re here to teach you the four core lash maps that you’ll need to know as a Lash Artist.
Style 1: Natural
This is the easiest, most universal lash map you’ll ever come across. It uses fewer length segments than most other lash maps and follows the natural growth of the lashes. This is what makes the Natural Lash Set such a universal style, and so easy to pick up for beginner Lash Techs. For the best results, use shorter lash extensions and a more natural curl, something like Chelsea 7–11mm lashes in a C curl or CC curl at most if you need a little extra lift.
A Natural lash map doesn’t have to be dull, you can add texture by including some longer lashes to add wisps through the lash line, or if you’re creating a volume lash set you can use some closed fans to add some spikes or texture to the set. Take a look at our guide to creating Angel Lashes and wispy lash sets.

Style 2: Dolly
A Dolly lash extensions set is sometimes referred to as an ‘Open Eye’ style. It’s the most symmetrical one and is characterised by having its longest lengths in the middle of the eye, tapering down to shorter lashes in the inner and outer corners.
Start by making a mark on the eyepatch in the middle of the eye—you’ll be able to tell where this is by looking at where the iris or pupil bulges slightly under the eyelid—and then make a mark before the first lash and after the last lash on the eye. Next, cut each of those segments in half and fill that space with your longest length. Continue doing this until you have as many sections as you’d like, always mirroring what you do on the left side with what you do on the right for precise symmetry.
With a Dolly set, you can use as many lengths as you like. Just consider that the more length you use, the more of a point you’ll create towards the centre of the eye. You don't want to overwhelm the eye or the look. That being said, you’ll still do your best work when you start with quite short lengths in the inner and outer corners to protect the lashes there, which tend to be shorter, finer or weaker.
A Dolly style is best used on clients with quite a bit of distance between their eyes or those with smaller eyes, as it creates the illusion of the eyes being closer together while opening them up.

Style 3: Squirrel
A Squirrel set is ever so slightly more dramatic than a Natural style, as it follows a typical brow arch and the way that natural lashes grow. Your longest lengths on a Squirrel eyelash set will be positioned from the centre of the eye to halfway through the outer section.
Squirrel lash sets are quite universal. The main clients they may not suit are those with very wide-set eyes.
As with a Dolly map, start by marking out the middle of the eye, then divide the outer section in half. The space between the middle of the eye and that halfway mark is where your longest lengths will go. With a Squirrel map, you’re aiming for a natural sweep from the inner corners to the longest section, before dropping back down to shorter lengths towards the outer corner.

Style 4: Cat
Whether you’ve been lashing for five minutes or 15 years, you’ve almost certainly been asked for a Cat Style at some point. Even your clients may be asking for that ‘cat-eye effect’. The interesting thing about a Cat Style is that it suits fewer eye shapes than many clients realise. Most Lash Techs would prefer to create a Squirrel style, which is more universal but less well known.
A Cat Style is characterised by its seductive lift towards the outer corners of the eyes. To achieve this, you need to use longer lashes towards the outer corners, which is one of the main reasons it doesn’t suit every client. Using longer lengths on the outer-corner lashes can weigh those lashes down, giving the eyes a sad or droopy appearance.
You could opt for an M Curl or even Extreme L Curl for additional lift. However, these curls can be slightly daunting when you’re newer to eyelash extensions, so it may be worth suggesting a Squirrel Style instead, which creates a similar overall effect with a softer finish.
The second reason a Cat Style doesn’t suit everyone is that it makes the eyes appear further apart. If your client already has wide-set eyes, the style can exaggerate that distance. Again, a Squirrel map offers a suitable middle ground. Cat lash maps are certainly achievable, but a thorough consultation is important to ensure the finished style suits the client’s features.

With any of these lash maps, you can make the finished set your own by adding closed fans, longer classic lashes or even some Coloured Lash Extensions to introduce extra texture and a pop of colour.
Check out these featured products